
This article provides a detailed guide for IT administrators on how to perform a mass deployment of the ClickShare Desktop App (Windows MSI) file using Microsoft Intune on Windows systems. Keep in mind that deployment via Microsoft Intune can vary depending on your company's security regulations and policies, so be sure to always check these before proceeding with the deployment.
Info! If you're planning to deploy ClickShare Desktop App MSI file on a mass scale using methods like Windows command scripts or Microsoft SCCM, please see to the following KB articles for assistance.
- Windows command scripts for MSI version 4.28 and higher (how-to, see KB8156)
- Windows command scripts for MSI version 4.27.2 and lower (how-to, see KB2531)
- Using Microsoft SCCM (how-to, see KB2190)
- Windows command scripts for MSI version 4.28 and higher (how-to, see KB8156)
- Windows command scripts for MSI version 4.27.2 and lower (how-to, see KB2531)
- Using Microsoft SCCM (how-to, see KB2190)
- Download ClicKShare Desktop App MSI file
- Creating IntuneWin file for deployment
- Importing IntuneWin file in Microsoft Intune
Step1. Download ClickShare Desktop App MSI file
Click here to download the ClickShare Desktop App MSI file you want to deploy.
Step 2. Create a IntuneWin file
- Download the ClickShare Desktop App MSI package you want to deploy.
- Download the IntuneWinAppUtil tool. Ignore, if already downloaded.
- Go to the location that contains the Intune Win 32 prep tool and then open the IntuneWinAppUtil.exe using command prompt or PowerShell.
- Specify the following:
- Specify the source folder that contains the MSI package: e.g. C:\TEMP\ClickShare\MSI
- Specify the setup file.
- Specify the output folder: e.g. C:\TEMP\ClickShare\IntunePackage
- Enter N on the question Do you want to specify catalog folder (Y/N)?.
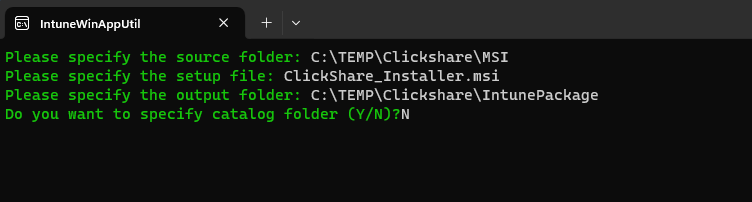
The IntuneWin file is ready to be imported in Microsoft Intune.
Step 3. Import the IntuneWin file in Microsoft Intune
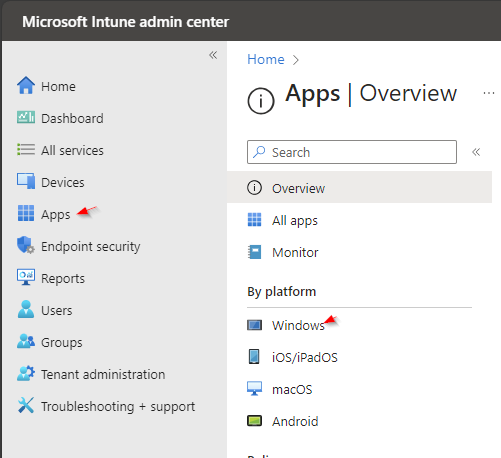
- Go to the Apps section on the Microsoft Intune Admin center.
- In the By Platform section, select Windows and click +Add.
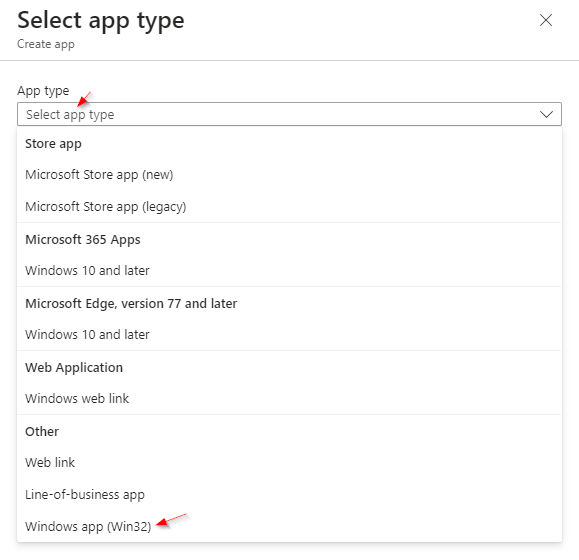
- Select Windows app (Win 32) and click Select.
- Click Select app package file and browse to the location that contains the IntuneWin file.
- Select the file and click Open.
- Click OK.
- Specify the App Information (fields marked with an asterisk * are mandatory):
- Name: The app name is automatically extracted from the IntuneWin file, you can modify the name if needed.
- Description: The description is automatically extracted from the IntuneWin file, you can modify the description if needed. Click Edit Description to modify the description.
- Publisher: Enter the Publisher name “Barco”
- App Version: This value is automatically extracted from the IntuneWin file.
- Category: Select an appropriate category. (e.g., Collaboration & Social)
- Show this as a featured app in the Company Portal: Select Yes if you want to display the app more prominently in the Company Portal.
- [Optional] Information URL: Enter a valid url to an information page about the app.
- [Optional] Privacy URL: Enter a valid url to an information about the app’s privacy settings.
- [Optional] Developer: Enter the name of the company or individual that developed the app.
- [Optional] Owner: Enter the name of the primary contact person for this app in your company.
- [Optional] Notes: You can add additional notes here.
- [Optional] Logo: Click Select Image to open the file location that contains a file that is associated with the app.
- Specify the Program information:
- Install command: This information is automatically extracted from the IntuneWin file but can me modified to add additional msiexec options: E.g. msiexec.exe /i "ClickShare_Installer.msi" /qn ACCEPT_EULA=YES APP_BASED_CONFERENCING=YES EXTENDED_DESKTOP=NO
- Uninstall command: This information is automatically extracted from the IntuneWin file.
- Installation time required (mins): You can modify the default value if needed.
- Allow available uninstall: Select Yes if you want to make the uninstall available via the Company Portal.
- Install behavior: System
- Device restart behavior: Select No specific action if you want to suppress an automatic reboot after installation.
- Specify the Requirements information:
- Operating system architecture: Select the appropriate version(s) for your environment.
- Minimum Operating system: Select the minimal version needed to install the app.
- [Optional] Disk space required (MB).
- [Optional] Physical memory required (MB).
- [Optional] Minimum number of logical processors required.
- [Optional] Minimum CPU speed required (MHz).
- Click Add if you want to add additional requirement rules.
- Specify the Detections rules information:
Remark: The ClickShare app has an automatic update feature, using the MSI detection rule can disturb the automatic update. MS Intune will push the latest published app version to the PCs over the automatically updated app.
Rules format: Select Manually configure detection rules.- Click +Add to add a detection rule
- Rule type: Select File
- Path: C:\Program Files (x86)\Barco\ClickShareApp
- File or folder: ClickShare_setup.exe
- Detection method: File or folder exists
- Associated with a 32-bit app on 64-bit clients: No
- Click OK.
- [Optional] Specify the Dependencies information.
- [Optional] Specify the Supersedence information.
- Specify the Assignments information:
- Required: Add the Required targets.
- Available for enrolled devices: Add the targets for which you want to make the app available in the Company Portal.
- Uninstall: Add the targets for which you want to uninstall the app.
- Review the settings and click Create.
The IntuneWin file will be upload in MS Intune and the Intune package will be deployed.
Note: The ClickShare Desktop App becomes active after a reboot.

