Required tools
- Vacuum cleaner
- Compressed air
Metal air filters
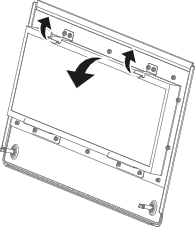
Push both filter holders to the outside and flip the filter out of the holder as illustrated.

Install either the cleaned filter or a new filter (if the old one is no longer usable).
Push both filter holders to the outside and flip the filter out of the holder as illustrated.
Install either the cleaned filter or a new filter (if the old one is no longer usable).