In this article, we are going to explain the different steps you need to take in macOS (provided screenshots and workflow are from macOS). This will include running the Button for the first time, granting the correct permissions, but also the workflow when you install the ClickShare App.
Some graphics shown in this article may differ depending on your macOS version, but this will not affect the procedures mentioned in this article.
For a successful configuration, the admin of the PC must configure the settings.
Using ClickShare via the Button
-
Insert the ClickShare Button into an available USB-C port on your Mac.
-
Once the Button is connected, click the ClickShare icon that appears on your desktop to open the ClickShare interface

-
In the interface, click on ClickShare_for_MacOSX located at the center of the screen to launch the ClickShare App.

-
Press the physical ClickShare Button or click the white circle within the ClickShare App to begin sharing.

-
Due to Apple’s updated privacy policies (starting with macOS Big Sur), you must grant permissions the first time you use the app. When prompted by the ClickShare App, click OK.

-
In the Screen & System Audio Recording section of your Mac’s Privacy settings, toggle the ClickShare App to “on”. You will need to authenticate using an administrator account

-
After enabling the necessary permissions, click Quit & Reopen to apply the changes

-
Upon reopening the ClickShare App, a final permissions prompt will appear. Click Allow to complete the setup and begin sharing your screen

You are now ready to begin sharing your screen. Once you’ve completed these steps for the first time, steps 5, 6, and 7 will no longer be required. For future use, simply follow steps 1 through 4 to initiate screen sharing.
For wireless conferencing (with ClickShare Conference CX-series models only)
-
Before starting your first video call, confirm that you are connected to the appropriate ClickShare Base Unit and have completed the screen sharing setup (refer to steps 1–8 in the previous section).
-
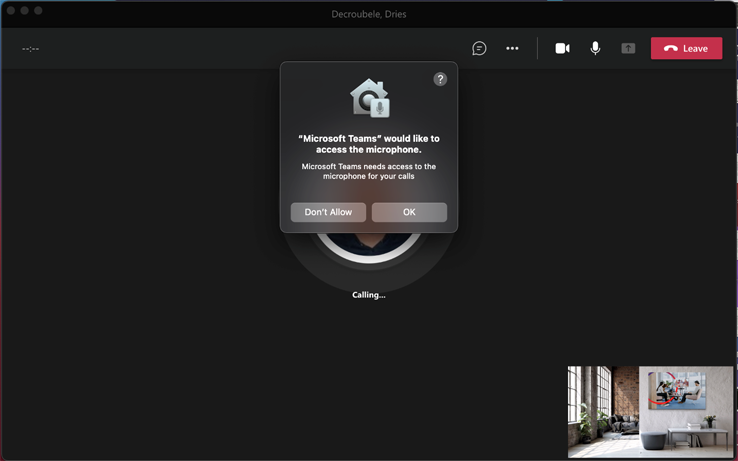
Launch your preferred conferencing application (e.g., Microsoft Teams, Zoom, Webex) and join the meeting. The example below uses Microsoft Teams. Upon joining the call, a prompt will appear requesting access to your microphone. Click OK to proceed.
-
This action will redirect you to the Security & Privacy settings, similar to steps 5 and 6 in the previous section. Enter your administrator credentials and enable microphone access for the ClickShare App.
-
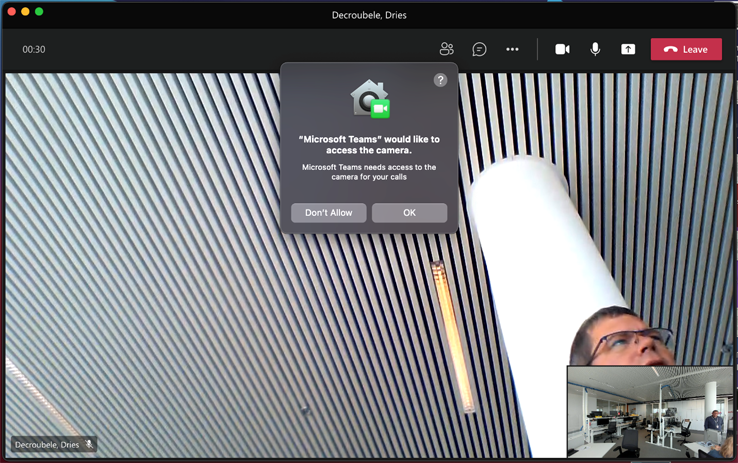
When the popup comes to grant permissions for the use of your camera, follow the same procedure as described in step 3 of the previous section.
-
You are now successfully using ClickShare Conference for wireless conferencing. These steps are required only during the initial setup. For future use, simply follow steps 1–4 from the previous section, then proceed to join your video call.
Using ClickShare via the installed app
-
You can install the ClickShare App either by launching the installer located on the ClickShare Button or by downloading it directly from www.clickshare.app.
-
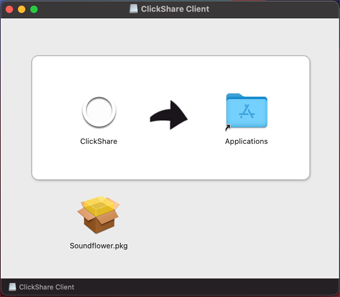
Open the
ClickShare_Setup.dmgfile and drag the ClickShare icon into the Applications folder to begin installation.
-
Installing the application requires administrator privileges. Ensure you have the necessary credentials to proceed.
-
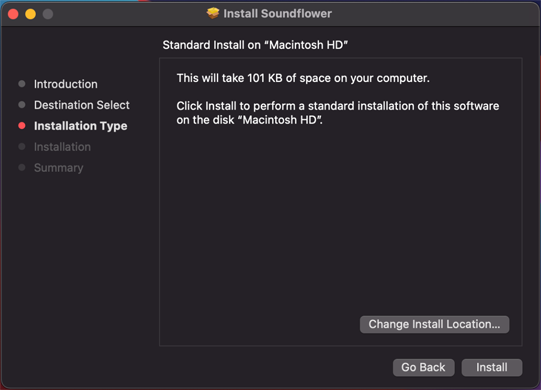
Install Soundflower (if applicable): If you are using an older Intel-based Mac and do not already have Soundflower installed, the installer will prompt you to install it. Follow the on-screen instructions to complete the installation.
-
When prompted with a privacy notification to trust Barco’s application, click OK to continue.
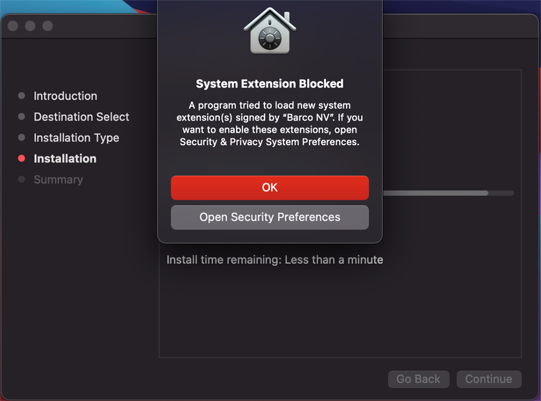
-
In the next screen, click the lock icon in the bottom-left corner, enter your administrator credentials, and click Allow to grant the necessary permissions.
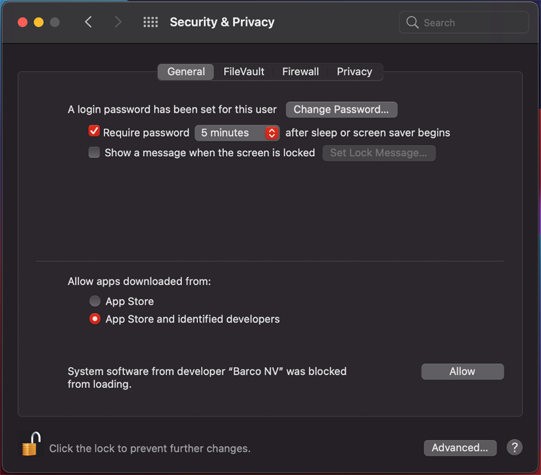
-
Click Restart to finalize the installation process.
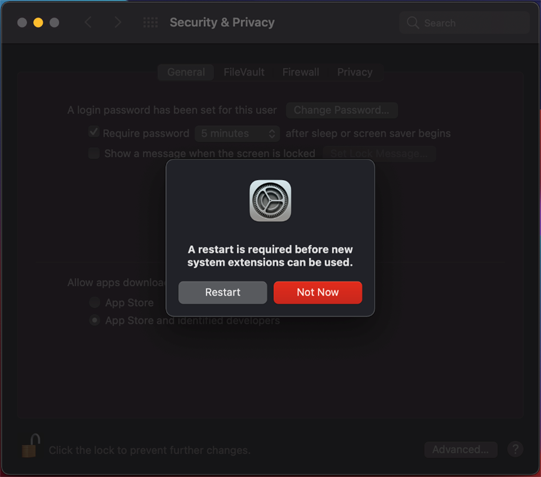
The ClickShare App is now successfully installed. From this point forward, the workflow follows the same process as using the ClickShare Button. To proceed with granting the necessary permissions, please refer to the steps outlined in the section Using ClickShare via the Button.
Notes:
- App-based Conferencing is not available for macOS yet, see KB2073 for details.
- If you're using a Mac with an Apple M1 chip and experience issues with audio not being mirrored when using the ClickShare App, see KB 4666 for details.
Related Articles
- Clickshare Desktop App on Mac PC crashes after launch
- How to use AirPlay to share to a ClickShare Base Unit from macOS
- Enabling macOS permissions for the ClickShare Desktop App
- What network protocols are supported for connecting devices (PC/mobile phone/tablet) to ClickShare?
- What are the supported AirPlay features for my Base Unit?
- How to share using ClickShare Desktop App?
- How to share with ClickShare Button


