5.8 ILD 0.37 UST 90° lens fine tuning

Prerequisites

This procedure assumes that the projector is installed in its final position and that the UST lens is pre-aligned and secured with the lens support. See procedures:

Required tools
How to fine tune the UST lens in its final position
  1. Power on the projector and display the checkerboard test pattern.

    Note: Allow the projector to warm up for at least 30 minutes. This ensures that the optics stabilize, preventing any focus drift after adjustments.
  2. Check If the projector is perfectly aligned with the screen. Projected image should be square and level. Project the green focus test pattern.
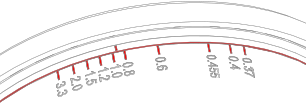
  3. Rotate the barrel of the secondary focus to achieve the best focus for the projected image. If the UST lens is correctly pre-aligned, the best focus should correspond with the throw distance on the scale.

    Image 5–17
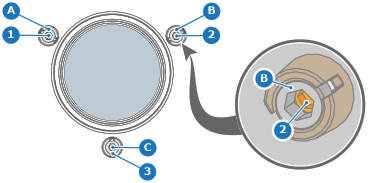
  4. If needed, fine tune the horizontal and vertical shift. Proceed as follows:

    1. Loosen the four fixation screws (reference 12 and 13) of the lens brackets to allow horizontal and vertical shift movements. Use a 3 mm Allen wrench.
    2. Enable the Horizontal and Vertical shift via Pulse Prospector: Setup > Optics > Optical Shift
    3. Adjust the horizontal and vertical shift.
    4. Disable the Horizontal and Vertical shift via Pulse Prospector: Setup > Optics > Optical Shift
    5. Fasten the four fixation screws (reference 12 and 13) of the lens brackets. Use a 3 mm Allen wrench.
    Image 5–18
  5. If needed, the Scheimpflug can be slightly adjusted while the lens is fixed in the lens support to correct any focus issues in the corners. Proceed as follows:

    1. Loosen the Scheimpflug lock nut (reference A, B, or C). Use a 5 mm Allen wrench.
    2. Slightly turn the Scheimpflug screw (reference 1, 2, and 3) to improve focus. Use a 4 mm Allen wrench
    3. Fasten the Scheimpflug lock nut. Use a 5 mm Allen torque wrench with a torque of 6 Nm.
    Image 5–19