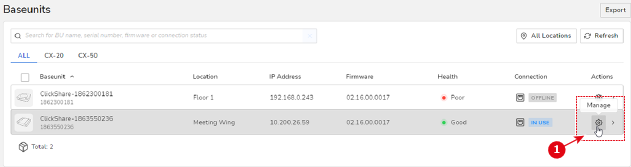
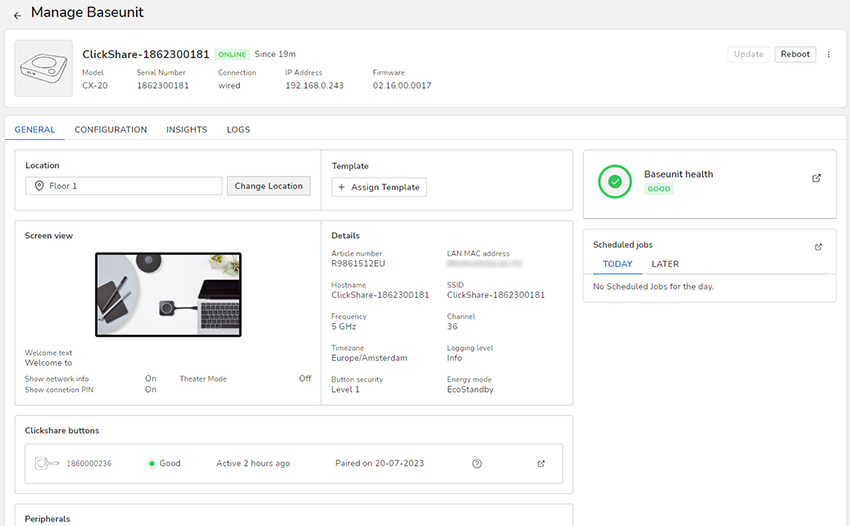
| General | | Location | Reviews the Location this Base Unit is located at. Click on the Change Location button to change the location using the Location selector. |
| Template | Assign a template. For more info, see “Edit and assign” |
| Base Unit health | Check the health of the Base Unit. For more info, see “Events” |
| Screen view | Shows the information that will be displayed on the screen the Base Unit device is connected to. You can only change the Wallpaper by hovering over the wallpaper image and clicking on the Change Wallpaper button. |
| Details | Shows the technical details of the Base Unit device. This includes article number, MAC address, hostname, SSID, Frequency, Channel, Time zone, logging level, security and Energy mode. |
| Scheduled Jobs | Check which jobs are scheduled for the Base Unit. Clicking on the Expand icon will lead you to the Scheduler. For more info, see “Scheduler”. |
| ClickShare Button | Shows the list of Button devices paired with the Base Unit device, as well as the current status of de devices. Clicking on the Expand icon will lead you to the Clients page. For more info, see “Clients”. |
| Peripherals | Shows all peripherals connected to the Base Unit. The following general information about the peripherals is also shown: - Name of the peripheral
- Status of the peripheral
- Firmware version
- Firmware compatibility status
- Status of the peripheral components
- Activity log
|
| Configuration | Personalisation | On-Screen ID | Type of On-Screen ID: Settings to be displayed on the Screen: - Language for on-screen text.
- Meeting room name (hostname): Default is “ClickShare-”+serial number
- Welcome message
- Show network info (on/off slider)
- Enable theater mode (on/off slider)
|
| Wallpaper | You can only change the Wallpaper by hovering over the wallpaper image and clicking on the Change Wallpaper button. |
| Display (& Audio) | Outputs | - Resolution
- Enable CEC (on/off slider)
- Enable audio (on/off slider)
- Screensaver timer
|
| Conference bar | Camera | - Group Framing
- Speaker Framing
- Composite Framing
- Fixed position
|
| Video | - Brightness
- Contrast
- Saturation
- Gamma
- White Balance
- Exposure
- Anti flicker
|
| WiFi & network | WiFi settings (Read-only) | - All WiFi settings (e.g. Operation mode, IP address, SSID, etc).
- Wireless client Settings (Operation Mode and pre-configure buttons)
|
| LAN settings (Read-only) | - LAN Hostname settings
- Primary Interface (Method, IP address, subnet Mask, gateway, DNS server)
|
| Services | - Mobile Devices: Enable/disable sliders for streaming devices (e.g. Chromecast, AirPlay, etc).
- Local View: toggle preview functionality in the ClickShare app
- SNMP: Enable slider, Engine ID, SNMP manager, name and password
- PresentSense: Enable Slider + signal strength
|
| Proxy Settings | Enable slider (+ details if enabled) |
| Security | Security Level | Security level picker (level 1–3) |
| System | Energy Savers | - Standby timer
- Standby type (ECO mode versus Deep standby)
|
| Blackboard | - Enable slider
- Allow saving to USB slider
|
| Date & Time | - Timezone
- Time format (24 hour versus AM/PM)
- NTP server enable slider (+ server location if enabled)
|
| Button connects to | - Chosen connection mode
- USB identification of Buttons as separate (default) or as tied to meeting room
|
| Support & Updates | Logging | Enable debug logging enable slider |
| Digital Signage[1] | Digital Signage apps | Chosen Digital Signage mode |
| Insights | | Average Base Unit usage | Graph showing the average usage and sharing by a selected time period (a week by default) |
| Total Base Unit usage by month | Graph showing the total usage and sharing by month |
| Logs | | | User logs |