Some ILD Ultra Short Throw (UST) lenses require a lens support. See chapter “Available lenses”, to know if the lens support is required for the lens. The lens support must be (partially) installed before installing the projection lens. See chapter “ILD UST lenses”.
How to install
Set the lens holder in the center position.
Using Pulse OSD: Menu > Installation > Optics > Shift to center
Using Pulse Prospector: Setup > Optics > Optical Shift > Shift to center
A shift to the center ensures that the lens holder is in the on-axis position, which avoids damaging the internal optics when inserting the lens.
Switch off the projector or activate the projector shutter.(shutter is activated when the shutter icon on the projector keypad is red).
Make sure to remove all protective caps present on the lens and lens holder.
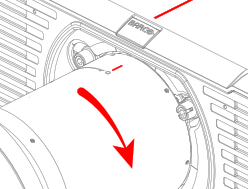
Gently insert the lens in the lens holder while aligning the short red line on the lens body with the red line on the projector top cover (reference 1).
Image 4–1
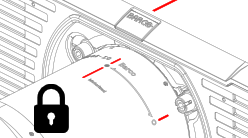
Once the lens is completely inserted, rotate the lens body clockwise until the long red line on the lens body is aligned with the red line on the projector top cover.
A click indicates that the lens mount mechanism is locked.
Image 4–2
Check if the lens is securely locked by trying to rotate the lens body counter clockwise. This should not be possible!
Image 4–3
Perform a lens focus and zoom calibration.
Using Pulse OSD: Menu > Settings > Maintenance > Lens calibration > Lens focus and Lens zoom
Using Pulse Prospector: Setup > Optics > Zoom & Focus > Focus calibration and Zoom calibration
In case of fixed focal lenses, the zoom calibration is skipped.
Warning: In case the projector is installed above the head of people, then the projection lens must be secured with a lens safety cable. See chapter “Lens safety cable installation”.