6.2 Scheimpflug adjustment

Required tools
Preparation steps
  1. Verify that the throw ratio of the installed lens matches the requirements of the installation area (projection distance and screen size).
  2. Check that the lens is correctly installed, and lens shift is in centre position.
  3. Project the internal Focus-Green test pattern.
  4. Zoom the lens to its widest opening (maximum image size on the screen).
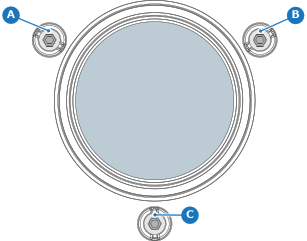
  5. Loosen the 3 Scheimpflug lock nuts a half turn (reference A, B and C).

    Image 6–4
  6. Optimize the focus of the projected image in the center of the screen (F) using the motorized focus control (Local keypad or remote control).

    Image 6–5
Scheimpflug adjustment steps
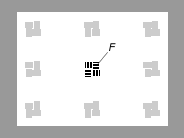
  1. Sharpen the image at the bottom right corner of the screen by turning the upper left Scheimpflug adjustment screw either clockwise or counterclockwise (reference 1) Use a 4 mm Allen wrench.

    Image 6–6

    As a result of this action, the focus in the center will fade a bit. This is expected behavior.

  2. Sharpen the image at the lower left corner of the screen by turning the upper right Scheimpflug adjustment screw (reference 2).

    Image 6–7
  3. Sharpen the image at the top center of the screen by turning the lower Scheimpflug adjustment screw (reference 3).

    Image 6–8
  4. Optimize the focus of the projected image in the center of the screen (F) using the motorized focus control (Local keypad or remote control).
  5. Repeat the previous steps until the projected focus pattern is as sharp as possible in the center, left, right, top and bottom of the screen.
  6. Fasten all Scheimpflug lock nuts (reference A, B and C Image 6–4). Use a torque wrench with a torque of 6 Nm.