Location
- Navigation side bar:
- Left panel:
Inputs can lose connection or go offline during an event. When this happens, Event Master Toolset can switch the input to a backup input. This ensures that an image is restored as soon as possible. When the original input is back online, then the Event Master Toolset will show a green dot (![]() ) before the name. The user can then decide whether the input must go back to the original input.
) before the name. The user can then decide whether the input must go back to the original input.
Is the slider in front of on?

Select a backup source from the drop down after .
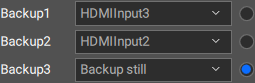
Click on the slider in front of to turn on the automatic backup functionality.

The label under the thumbnail will indicate whether the source is active or a source is active.