6.6.1 Wi-Fi settings

SCEP
Simple Certificate Enrollment Protocol is a protocol that simplifies the requesting and issuing of digital network certificates for network equipment. Mainly used in bigger organisations where a large number of network equipment must be managed. To use SCEP, ClickShare requires the SCEP server address, the SCEP challenge and a name for ClickShare to identify itself on the SCEP server. This information is obtained from the local IT department.
NDES
Network Device Enrollment Service is a setup for a separate server that runs SCEP to manage digital network certificates for network equipment. Many implementations of SCEP use NDES. To use NDES, ClickShare requires the SCEP server address, the username and password ClickShare must use to log into the NDES server and a name for ClickShare to identify itself on the SCEP server. This information is obtained from the local IT department.
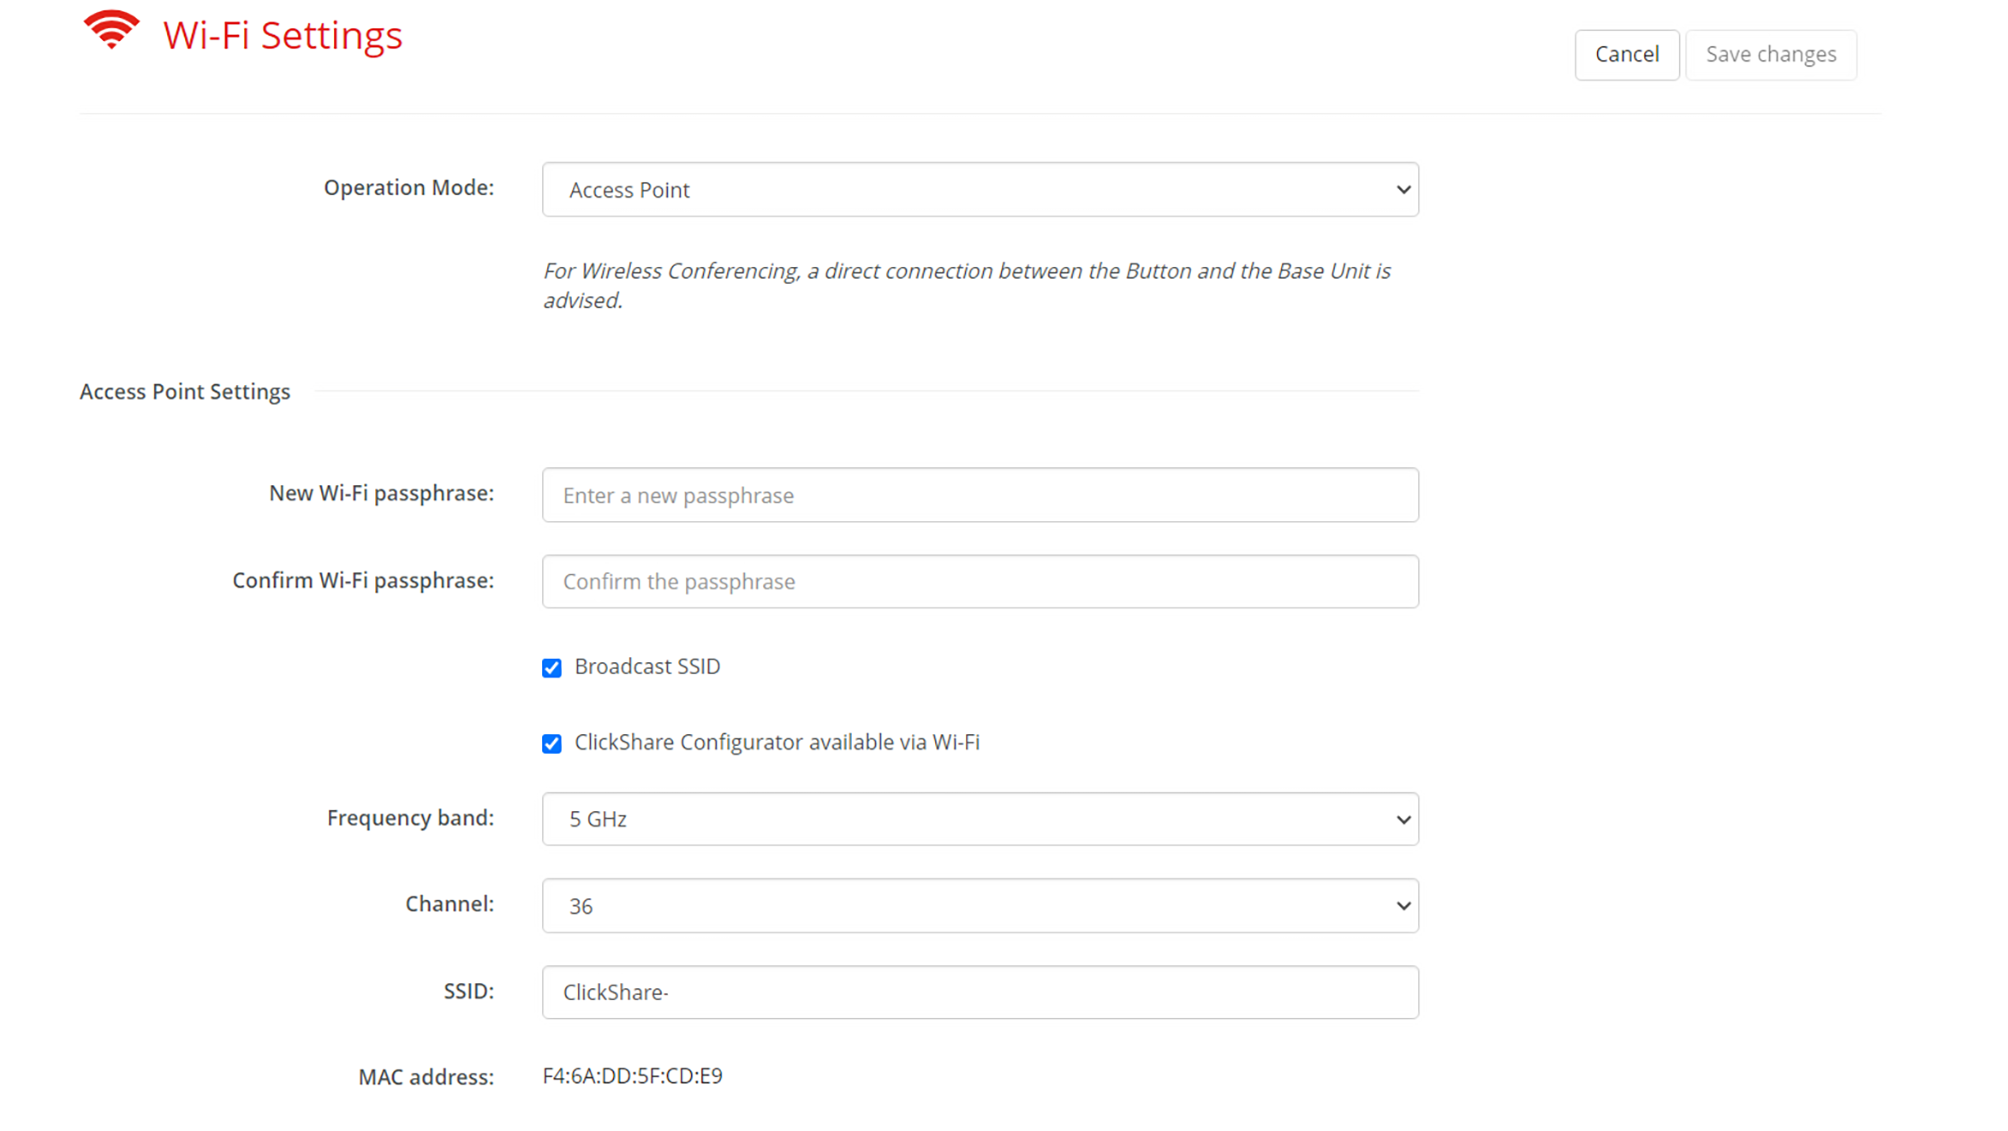
About Wi-Fi settings

An overview of the current settings is given when opening the Wi-Fi settings. These settings can be modified by clicking the “Edit settings” push button at the top right.

Image 6–37 Example of the Wi-Fi settings overview

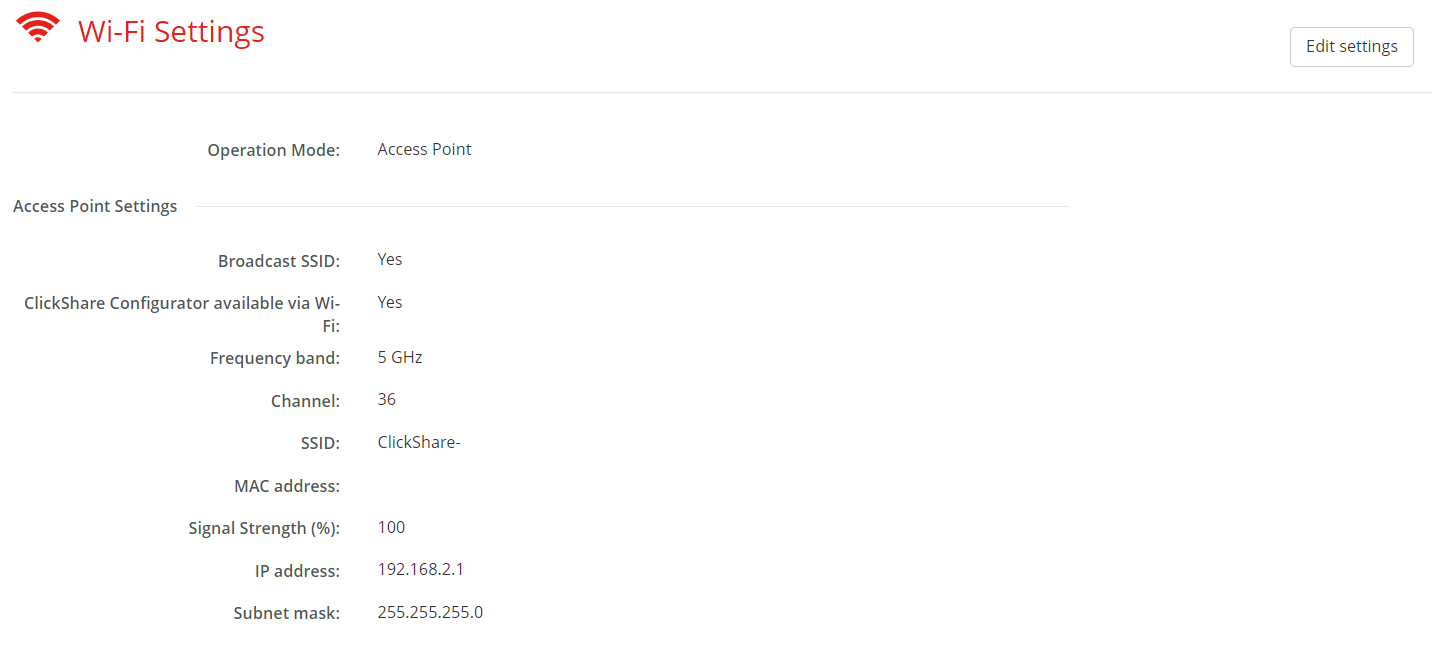
The Wi-Fi can be configured in multiple main ways:

Choose the desired mode from the drop-down box after “Operation Mode”. Depending on the chosen operation mode, different settings will be visible.

Image 6–38 Example of the edit page for Wi-Fi settings
How to configure access point mode
  1. Choose and enter a passphrase (password) for the Wi-Fi network in the input field after “New Wi-Fi passphrase”.

    Tip: There are no required criteria for creating the password. In general the longer the password the more secure.
  2. Confirm the passphrase by entering the same passphrase (password) a second time in the input field after “Confirm Wi-Fi passphrase”.
  3. Must the network be discoverably by wireless devices?

    • Yes, check the checkbox in front of “Broadcast SSID”.
    • No, uncheck the checkbox in front of “Broadcast SSID”.
  4. Must the configurator be accessible through Wi-Fi connections?

    • Yes, check the checkbox in front of “ClickShare Configurator available via Wi-Fi”.
    • No, uncheck the checkbox in front of “ClickShare Configurator available via Wi-Fi”.
  5. Choose the desired frequency from the drop-down list after “Frequency band”:

    • 5 GHz (default), recommended
    • 2.4 GHz, not recommended
  6. Change the channel by selecting a number from the drop-down list after “Channel”.

    Note: Stagger the channels used by wireless devices in the same area to minimize interference of the signals. Use a wireless channel analyzer near the location of the Base Unit to find the least crowded channel.
    Image 6–39 Example of channel overlap for 5GHz
  7. Name the wireless network by entering an SSID in the input field after “SSID”.

    Note: A name is required even if the SSID is set to hidden!
  8. Optionally slide the red dot next to “Signal Strength (%)” to decrease the strength of the signal by the number closest to the red dot.

    Decreasing the signal strength is a great way to minimize the signal being present and interfering with other signals outside of the meeting room.

  9. Optionally modify the IP address of the Base Unit.

    Note: For more information about how to manually configure the IP address, contact the local IT responsible of the network.
  10. Click “Save changes” at the top of the page to commit the changes to the Base Unit!
How to configure wireless client mode
  1. Select the applicable authentication mode from the drop-down list after “Authentication Mode”:

    • WPA2-PSK, using a password to authenticate clients.
    • PEAP, allowing for either the EAP-TLS and EAP-TTLS methods of authentication depending on the setup.
    • EAP-TTLS, using a log-in server where the server issues certificates to the client via user authentication with password credentials.
    • EAP-TLS, using a log-in server where both client and server require a certificate. The certificates can be provided to ClickShare by SCEP, NDES or manual upload.
    Tip: SCEP requires the SCEP server address, the SCEP challenge and a name for the Base Unit to identify itself on the SCEP server.

    NDES requires the SCEP server address, the username and password Base Unit must use to log into the NDES server and a name for Base Unit to identify itself on the SCEP server.

    Depending on which authentication was chosen, different input fields and/or drop-down lists will be shown.

  2. Fill out the required network detail fields to authenticate the Base Unit as a client of the host network.

    Note: For information about how to fill in these fields or what to select for the drop-down lists, contact the local IT responsible of the network.
  3. Decide how the Base Unit must acquire its IP address, by selecting an option from the drop-down list after “Method”:

    • Automatic (DHCP), IP configuration will be handled by the network.
    • Manual, input fields below the “Method” drop-down list will be enabled to allow for static IP address configuration.
    Note: For more information about how to manually configure the IP address, contact the local IT responsible of the network.
    Tip: A static IP address is preferred. The IP address of the Base Unit is the fallback for Button(s) that cannot find the Base Unit through other methods.
  4. Click “Save changes” at the top of the page to commit the changes to the Base Unit!
Off

Disables all Wi-Fi functionality of the Base Unit.