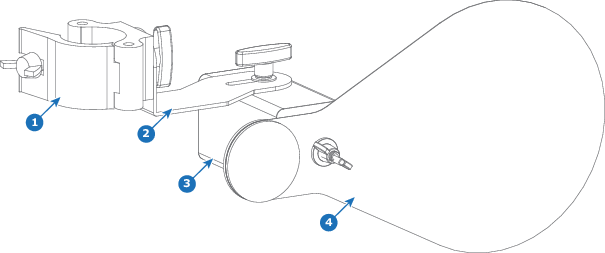
10.1 About the external mechanical shutter

Content of the kit
ContentPieces
Shutter motor with XLR cable (60 cm length, 4-pin male connector)1
Shutter flap1
Coupler1
Bracket1
T-handle (longer)1
T-handle (shorter)1
Propeller screw & washer set for shutter flap1
Ribbed washer4
Safety wire 1
XLR 4-pin cable splitter (1x male – 2x female) 1
Parts identification
Image 10–1
1
Coupler
2
Bracket
3
Shutter motor
4
Shutter flap
Functionality of the shutter motor
ButtonFunction
Mode / Setup

Use a long press to enter the setup mode. While in setup mode, the display panel will blink.

While in setup mode, use short presses to select the desired mode (1–4).

x100 / OK

A short press sets the digit of the DMX channel in multiples of hundreds.

Use a long press on this button to confirm the selected channel or mode.

x10A short press sets the digit of the DMX channel in multiples of tens.
x1 / Test

While in setup mode, a short press sets the digit of the DMX channel in multiples of one.

While not in setup mode, this button functions as “test” button. A short press will test the shutter functionality for the chosen mode (open and close).

Image 10–2
1
Digit indicates the mode condition
2
Digits indicates the DMX channel
3
Mode / Setup button
4
x100 / OK button
5
x10 button
6
x1 / Test button
Image 10–3 Modes as depicted on the side of the motor
1
Linear, -90° (counterclockwise)
2
Linear, +90° (clockwise)
3
Switch, -90° (counterclockwise)
4
Switch, +90° (clockwise)
Tip: Preferred modes are mode 3 and 4.