Caution: Use only the power cord supplied with your device. When no power cord for your region/country is provided, contact your dealer. The power cord must be suited for the electrical ratings indicated on the product ID label. Only power cords according to the local electrical code regulations can be used.

Caution: Once the projector is switched from ready or on mode to standby mode, the cooling fans will continue to run for approximately 30 seconds to ensure that the projector and light source have sufficiently cooled, at which point the fans will automatically decrease to standby. To avoid thermal stress that can lead to premature light source failure, never unplug the power cord while the cooling fans are running. Never unplug the power cord to power down the projector, first switch off the power switch and then unplug the power cord.
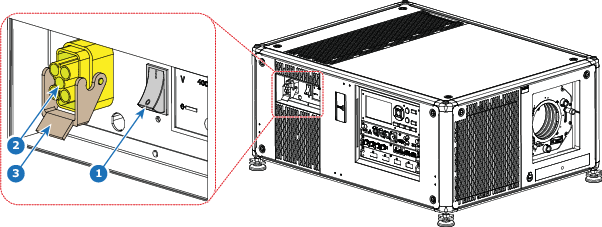
Fuses
The projector is protected with an automatic circuit breaker of 25 A which is built into the power switch.
The voltage meter is protected with a fuse (1A) which is located on the neutral bonding cable. If necessary to replace this fuse, consult a service technician.